With the weather changing I decided it was time to do a little maintenance on my '66 Toro. I want to replace all of the vacuum lines, clean up the heater controls for proper operation, (only the defrost button stays in at the moment but the vacuum line to the heater box is toast so I get nothing) make all my guages work, and possibly try to breath some life into my Wonderbar radio.
While I was taking the connectors off the dash, a few of the pins came with the connector (maybe that is why the gauges were not working?) Any suggestions? Is there some outfit that sells some sort of new crimp on pins or something? I thought about putting a very fine screw or something in there but I'm not sure that will work with the connector.
I took the heater controls apart and after some tapping and banging the vacuum valve moves properly allowing all of the buttons to work as they should….hopefully the valve works without leaking!
Anyone have any tips on how to clean up the Wonderbar? I don't have the money to pay someone hundreds of dollars right now for a proper rebuild. It works right now (at least the front speaker) but it won't stay tuned very well. Whenever I try to use the wonderbar it really sounds like crap or the sound completely goes away.
Gauges
-
Doc Hubler

- Posts: 363
- Joined: Thu Sep 27, 2012 9:37 pm
- TOA Membership Number: 992
- Years Owned: 1967
Re: Gauges
First: It would be helpful to have some pictures so we know exactly what you're talking about. If you're working under the dash, you'll have a difficult time fixing any of this. the only proper way to fix these problems is to take the dash out. Not an easy job really, but not horrible either.
I have my unit out and can take pictures of the back of that help you get a better idea. I just rebuilt my wiring harness for the doors, and had to resolder, and in some cases, reuse, some of the connectors since they aren't always available. It's not that bad, but will take you some time and you have to round up the equipment. At first, my soldering was crappy, but practice really improves the capability.
THe lights and gauges at the top of the dash operate off of a circuit board that is on each side. The multi-plug goes onto the pins which are a part of the board. If those have been broken off, you definitely will have to take the dash out and repair them, if you can. One of my boards was warped and cracked the copper circuit connection inside the board. So it's useless. I had a parts car and was able to obtain a workable unit from that. Now I understand why half the dash wouldn't light up (I thought the bulbs were burned out).
On your vacuum tubes, if you want to keep things more stock looking, I did get some paint pens to redo the color striping on new vacuum tubing (bought the black vac tubing at NAPA). So I will paint/stripe all my tubes. I think it will work out well.
- Attachments
-
- The Comfortron unit is out on the dash to finish up a few items before reinstall. The Cruise Control wheel is also out -- have to fix the linkage. The bezels at the bottom are off until I get the correct font to have the trophy shop engrave them on the aluminum panels. The clock has been converted to quartz movement, and the Wonderbar has been completely serviced. All circuits were bench tested. New felt for the air vent, Comfortron, Cruise Dial have been obtained and fitted.
- 67 Toro Dash.jpg (92.46 KiB) Viewed 17253 times
-
Doc Hubler
- Posts: 363
- Joined: Thu Sep 27, 2012 9:37 pm
- TOA Membership Number: 992
- Years Owned: 1967
Re: Gauges
BTW, I also replaced the green films in the turn indicator windows. I kept the original parking brake (red) and High Beams (Violet letters -- violet film painted black except letters). For some reason, every Toro (and there are few restored ones or well garaged ones out there) has the green films disintegrated -- must be that those absorbed the UV radiation from sun more, and quickly came apart. I didn't know if they had an arrow on them or not, so just left them plain green. Does anybody have the answer to that. Should fix it before I reinstall. I might just use a dry transfer arrow for that.
THanks, Tim
THanks, Tim
-
orman_s
- Posts: 20
- Joined: Thu Sep 12, 2013 7:26 am
- TOA Membership Number: 0
- Years Owned: 1966 Toronado Deluxe
Re: Gauges
That's a good looking dash! I don't know if I am going to take the time to strip and repaint mine right this second but I might have to after seeing that. I will try to take some pictures of mine later today and post them.
The dash is out of the car right now.
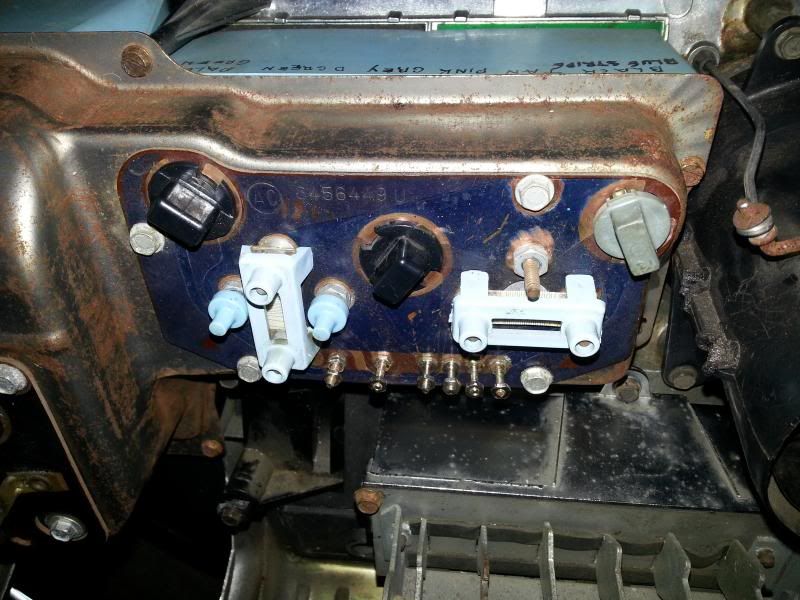
Someone along the line has done a little rework. The circuit board that has the fuel/temp gauges on it no longer has any pins. They have been replaced by tiny screws, presumably because the pins broke off when they were removing the dash. They cut the connector out of the wiring harness and replaced it with what looks to be some small "L" shaped pieces of brass that gets secured to the screw with a little nut.
I'm not really a fan of this because if one of the nuts comes loose the little "Ls" have the potential to touch each other.
What I would really like to do is replace the circuit board and connector. I have an inquiry out to someone who has a couple parts cars on Craigslist but haven't heard back. Does anyone our here happen to have a couple circuit boards and a connector in good shape?
My other problem is that when I was taking the dash out, one of the pins on the circuit board for the oil/amp gauges stayed in the connector. The pins look like they are maybe pressed into the board and get secured by 4 tabs that get bent over. Age, vibrations, and gorilla man-handling look to have taken their tolls on the pins causing some of the tabs to break off making the pins loose and more susceptible to failure. You say you have soldered these? To what? The copper traces?
(Sorry, I know it is difficult to understand what I am saying without pics)
As for the vacuum hoses…I already have a couple rolls of Gates hose from Rock Auto and some paint pens I picked up from Michaels. I made up a little jig to try to paint the lines a little straighter than I was able to do by hand but it was a quickie thing and really doesn't work that well.
The dash is out of the car right now.
Someone along the line has done a little rework. The circuit board that has the fuel/temp gauges on it no longer has any pins. They have been replaced by tiny screws, presumably because the pins broke off when they were removing the dash. They cut the connector out of the wiring harness and replaced it with what looks to be some small "L" shaped pieces of brass that gets secured to the screw with a little nut.
I'm not really a fan of this because if one of the nuts comes loose the little "Ls" have the potential to touch each other.
What I would really like to do is replace the circuit board and connector. I have an inquiry out to someone who has a couple parts cars on Craigslist but haven't heard back. Does anyone our here happen to have a couple circuit boards and a connector in good shape?
My other problem is that when I was taking the dash out, one of the pins on the circuit board for the oil/amp gauges stayed in the connector. The pins look like they are maybe pressed into the board and get secured by 4 tabs that get bent over. Age, vibrations, and gorilla man-handling look to have taken their tolls on the pins causing some of the tabs to break off making the pins loose and more susceptible to failure. You say you have soldered these? To what? The copper traces?
(Sorry, I know it is difficult to understand what I am saying without pics)
As for the vacuum hoses…I already have a couple rolls of Gates hose from Rock Auto and some paint pens I picked up from Michaels. I made up a little jig to try to paint the lines a little straighter than I was able to do by hand but it was a quickie thing and really doesn't work that well.
-
orman_s
- Posts: 20
- Joined: Thu Sep 12, 2013 7:26 am
- TOA Membership Number: 0
- Years Owned: 1966 Toronado Deluxe
Re: Gauges
Got pics!!....
This mess is where the connector should be...

and this is the circuit board sans pins
This mess is where the connector should be...

and this is the circuit board sans pins

-
orman_s
- Posts: 20
- Joined: Thu Sep 12, 2013 7:26 am
- TOA Membership Number: 0
- Years Owned: 1966 Toronado Deluxe
Re: Gauges
Trying to free up some more space to work with the vacuum hoses....anyone know how the right side of the dash comes apart? I have the glove box and ashtray taken out. I would like to take the vent as well but it seems quite wedged in there. Any suggestions?
-
Doc Hubler
- Posts: 363
- Joined: Thu Sep 27, 2012 9:37 pm
- TOA Membership Number: 992
- Years Owned: 1967
Re: Gauges
My entire dash is out. I can take pictures if taht will help you. I do remember that just to the right of where the glovebox is, there is the rounded piece that does the corner. That has some difficult connectors to get to, but keep at it and it will come free. You have to remove the padded dash surround to get to one of the screws that removes the panel just above the ash tray and glovebox. and I think you have to remove the center vent. Actually, I think there are pretty good diagrams in teh 1967 Oldsmobile Shop manual (Toro section at the back). It a bear. Once you start taking it out one thing leads to another. If you go that far, replace the firewall insulation as it seems that stuff starts to decompose and shed all over. Also check out your radio speaker. It's the only way you'll ever get to it and if you have the dash apart, just get it all the way so you can service the speaker. You can't get it out any other way. You'll have to take out the central air distribution piece and disconnect the hoses leading to the vents on both sides of the dash. I had my dash pieces redone (the 3 pieces) at a place in Oregon. They look great!
-
Doc Hubler
- Posts: 363
- Joined: Thu Sep 27, 2012 9:37 pm
- TOA Membership Number: 992
- Years Owned: 1967
Re: Gauges
I'll go back and look at those circuit boards and see if I think I could solder them. If they looked seriously warped or cracked, it's probably a waste of effort. You'll need replacements.
-
orman_s
- Posts: 20
- Joined: Thu Sep 12, 2013 7:26 am
- TOA Membership Number: 0
- Years Owned: 1966 Toronado Deluxe
Re: Gauges
Yeah, my speaker is toasted. Is there a favorite people are replacing them with?
-
waterzap
- Posts: 51
- Joined: Sun Jun 02, 2013 7:13 pm
- TOA Membership Number: 1058
- Years Owned: - 1967 Toronado
- 1978 Eldorado
Re: Gauges
Is there a way to take the radio out without removing the dash?
Tried to take the dash out the other day to put new lights in. Could not get the speedo cable loose, but did manage to get new lights in there.
Tried to take the dash out the other day to put new lights in. Could not get the speedo cable loose, but did manage to get new lights in there.
Who is online
Users browsing this forum: No registered users and 22 guests